介绍 对于springboot+vue、asp.net还是其他一些技术,我们实现网页都需要较长的学习时间,因此,为了快速开发,满足需求,我参考Python的Flask编写了这篇文章。
我使用的是flask+mysql的web网页集成开发。
参考文献如下:
Flask官方文档
Flask 入门教程
既然介绍说完了,那就开始吧。
准备工作
在学习Flask之前,你需要具备Python和Html的基本知识,如果没有这方面的知识,可以先去学习一下再回到本文章
Python的本地环境建议3.9.0以上版本,对于IDE工具,你可以使用PyCharm、VsCode、VisualStudio
安装Flask 安装成功后就可以正式写代码了
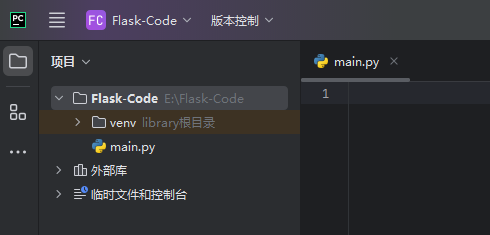
一、你的第一个Flask应用 初始化项目 我使用的是PyCharm,当然你也可以选择其他IDE工具
新建一个项目,然后创建一个基于本地python解释器的虚拟环境(防止污染本地环境)
编写代码 在main.py中编写以下代码,这样你就成功拥有了第一个Flask应用
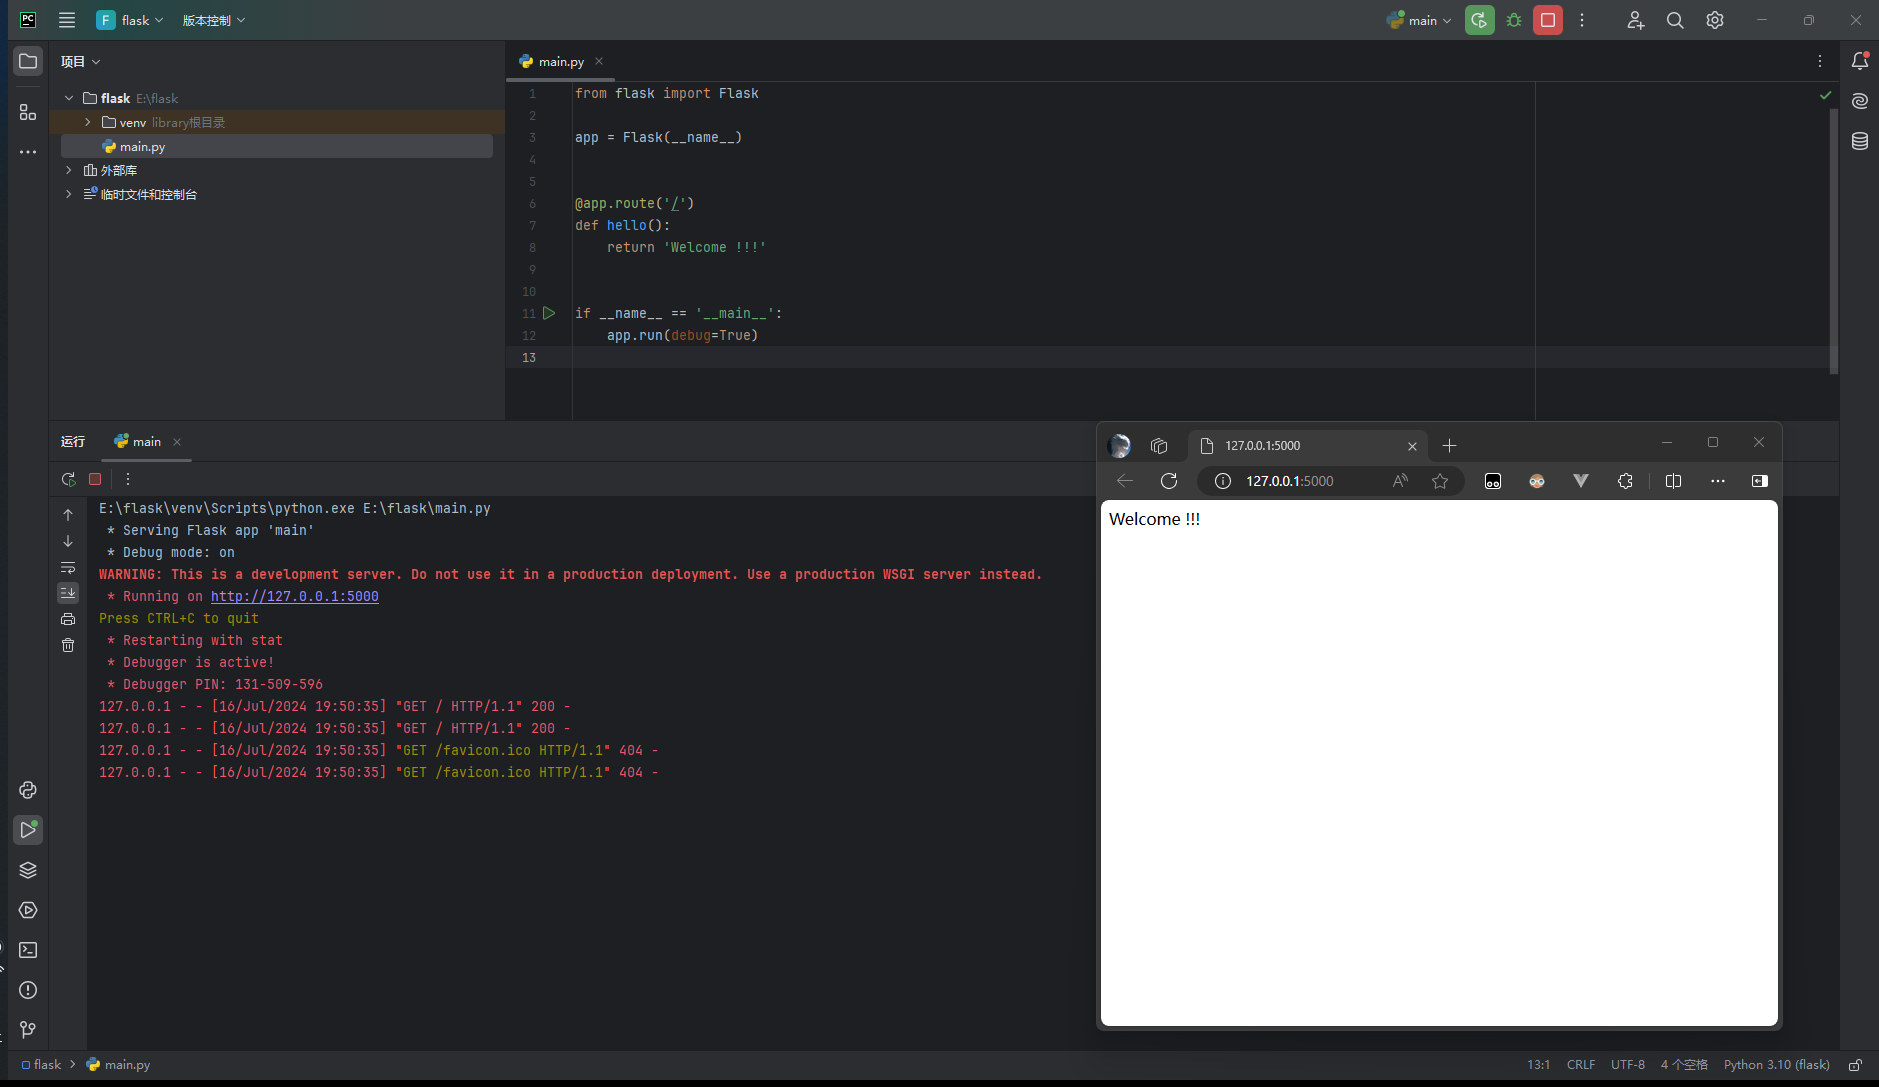
1
2
3
4
5
6
7
from flask import Flask@app.route('/' def hello ():return 'Welcome to My Watchlist!'
代码分析 如上面所见,我们成功初始化了一个flask项目,那么我们都做了什么呢?
1
2
from flask import Flask
我们导入了flask库,实例化了这个类
1 2 3 @app.route('/' def hello ():return 'Welcome !!!'
我们创建了一个函数,在这个函数前面,我们使用了@app.route('/')装饰器,它将我们导向了对应的url
我们可以在这里做一些数据的处理,然后你就可以启动服务后访问到它
对于函数名,我们可以自由定义
此处函数的return值可以被html解析成html,也可以是其他数据。
装饰器的一些使用原则
关于@app.route(‘/‘)URL规则
1.route内部的url都可以运行在部署的端口上,其编写规则是以斜线 /作为开头 。 1 2 3 @app.route('/login' def hello ():return 'Welcome !!!'
2.对于一个函数,可以附加多个装饰器@app.route(‘/‘)。 1 2 3 4 5 @app.route('/' @app.route('/login' @app.route('/admin' def login ():return open (html_path+"login.html" , "r" , encoding="utf-8" ).read()
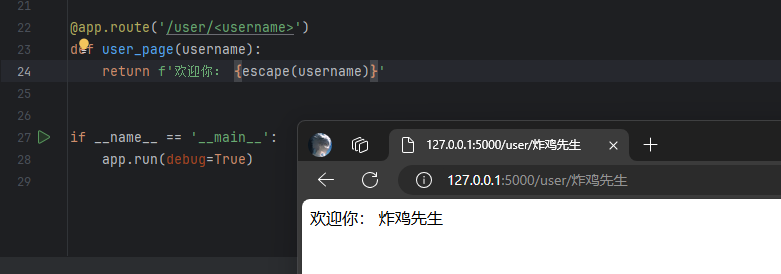
3.对于@app.route(‘/‘),我们还可以定义变量。 1 2 3 @app.route('/user/<username>' def user_page (username ):return '欢迎你' + username
用户输入的数据会包含恶意代码,所以不能直接作为响应返回,需要使用 MarkupSafe(Flask 的依赖之一)提供的 escape() 函数对 name 变量进行转义处理,比如把 < 转换成 <。这样在返回响应时浏览器就不会把它们当做代码执行。
1 2 3 4 5 from markupsafe import escape@app.route('/user/<username>' def user_page (username ):return f'User: {escape(username)} '
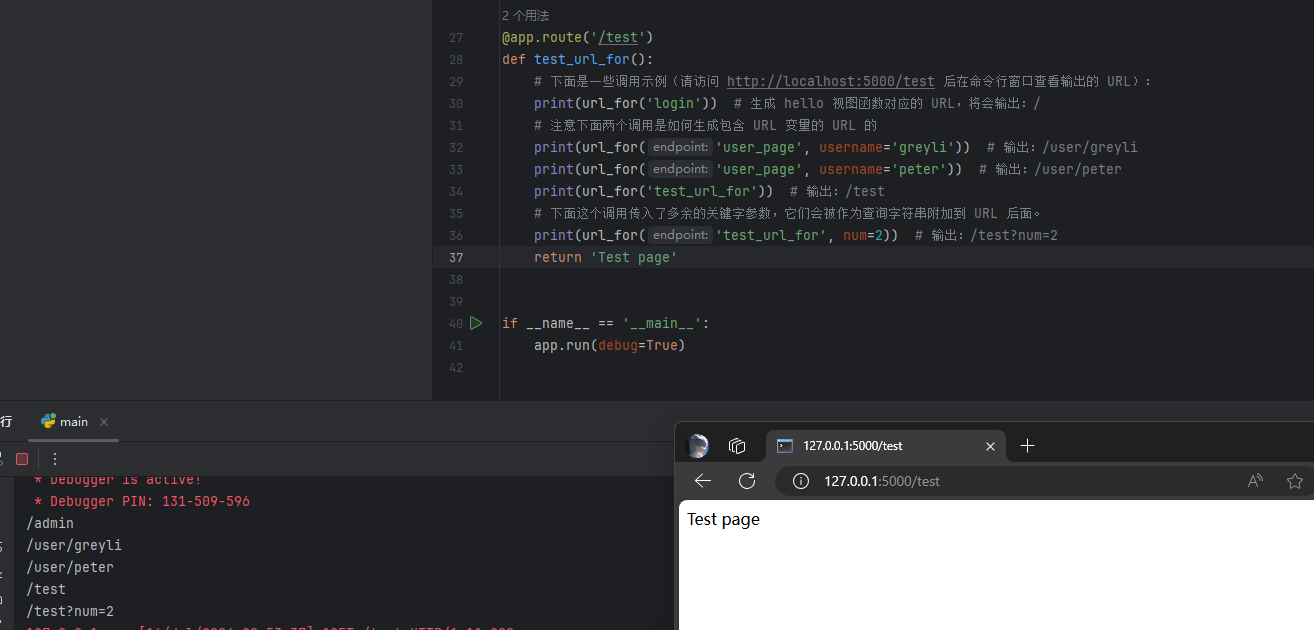
视图函数的一些技巧 我们可以通过url查看使用哪个函数
作为代表某个路由的端点(endpoint),同时用来生成视图函数对应的 URL。
对于程序内的 URL,Flask 提供了一个 url_for 函数来生成 URL,它接受的第一个参数就是端点值,默认为视图函数的名称
1 2 3 4 5 6 7 8 9 10 11 12 from flask import url_for@app.route('/test' def test_url_for ():print (url_for('login' )) print (url_for('user_page' , username='greyli' )) print (url_for('user_page' , username='peter' )) print (url_for('test_url_for' )) print (url_for('test_url_for' , num=2 )) return 'Test page'
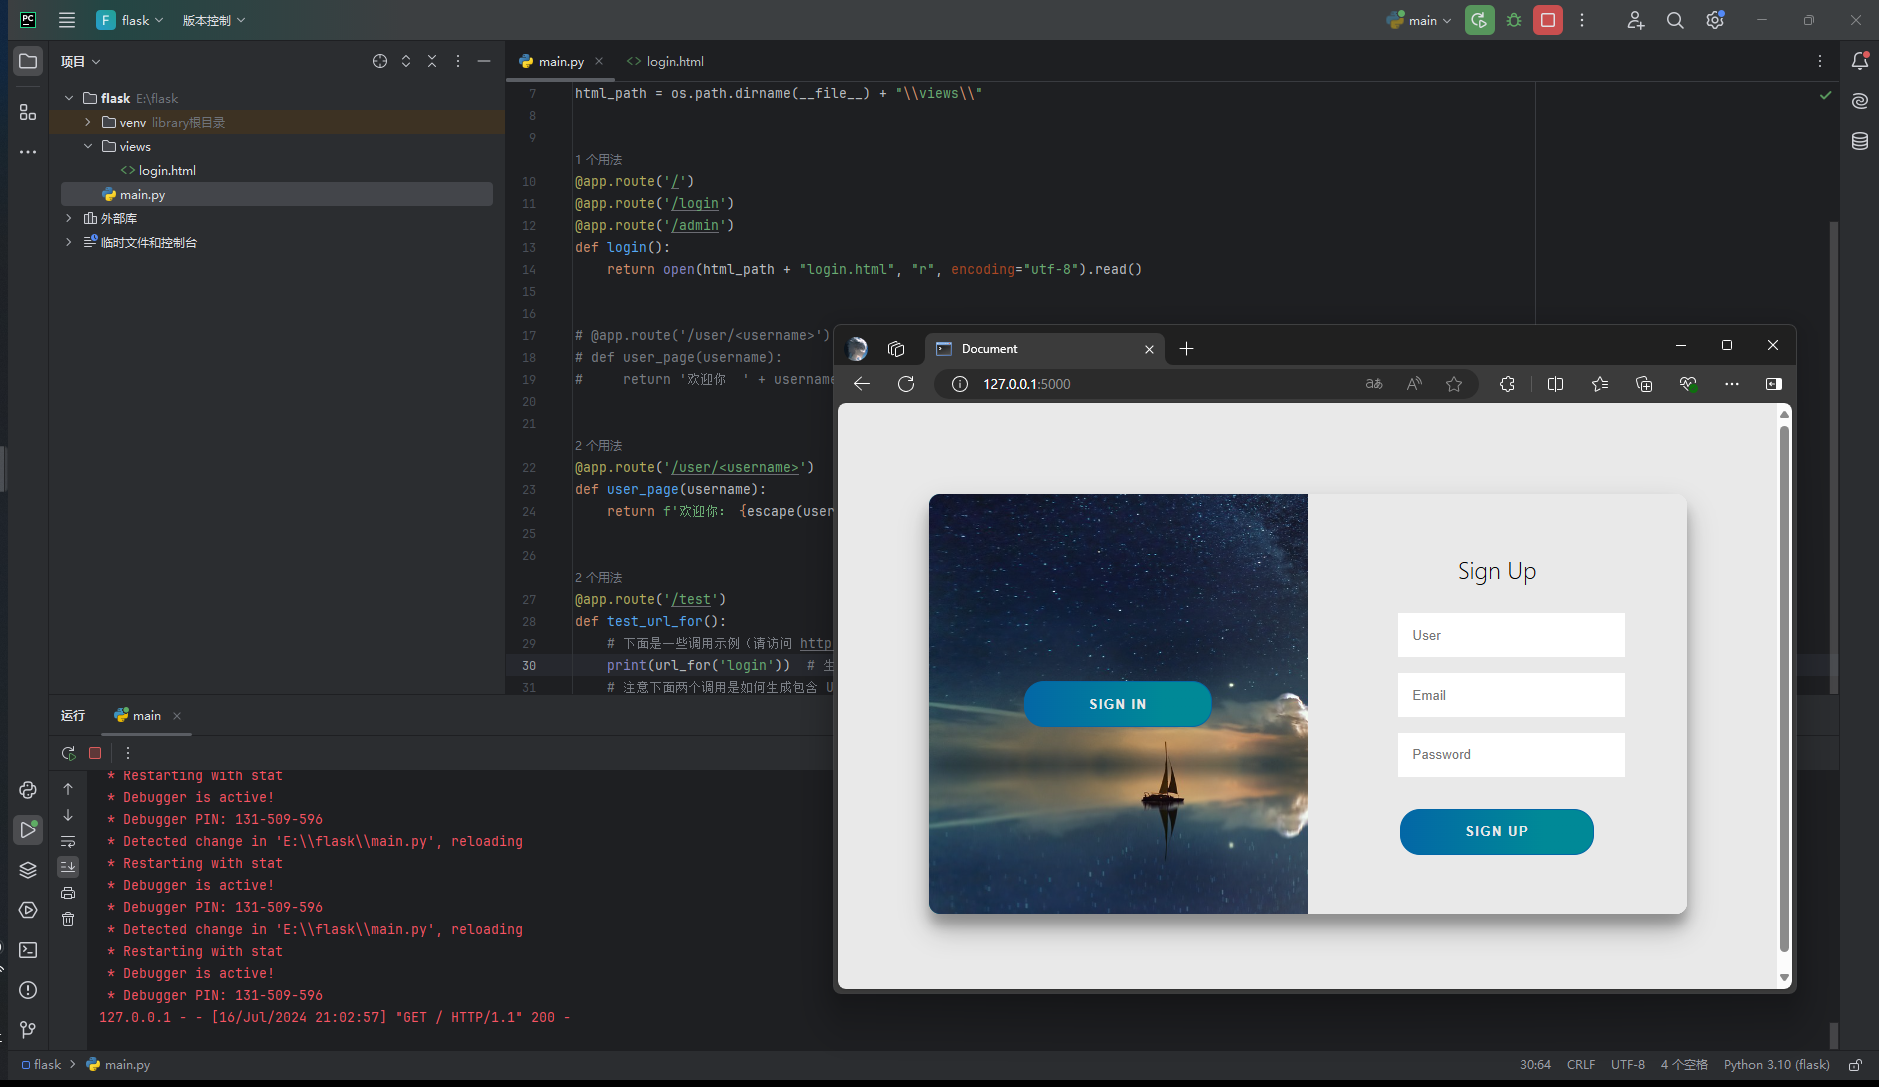
举例 我导入一个html文件,然后返回这个html页面
main.py
1 2 3 4 5 6 7 8 9 10 11 12 13 14 15 import os.pathfrom flask import Flask"\\views\\" @app.route('/' def login ():return open (html_path+"login.html" , "r" , encoding="utf-8" ).read()if __name__ == '__main__' :True )
login.html
1 2 3 4 5 6 7 8 9 10 11 12 13 14 15 16 17 18 19 20 21 22 23 24 25 26 27 28 29 30 31 32 33 34 35 36 37 38 39 40 41 42 43 44 45 46 47 48 49 50 51 52 53 54 55 56 57 58 59 60 61 62 63 64 65 66 67 68 69 70 71 72 73 74 75 76 77 78 79 80 81 82 83 84 85 86 87 88 89 90 91 92 93 94 95 96 97 98 99 100 101 102 103 104 105 106 107 108 109 110 111 112 113 114 115 116 117 118 119 120 121 122 123 124 125 126 127 128 129 130 131 132 133 134 135 136 137 138 139 140 141 142 143 144 145 146 147 148 149 150 151 152 153 154 155 156 157 158 159 160 161 162 163 164 165 166 167 168 169 170 171 172 173 174 175 176 177 178 179 180 181 182 183 184 185 186 187 188 189 190 191 192 193 194 195 196 197 198 199 200 201 202 203 204 205 206 207 208 209 210 211 212 213 214 215 216 217 218 219 220 221 222 223 224 225 226 227 228 229 230 231 232 233 234 235 236 237 238 239 240 241 242 243 244 245 246 247 248 249 250 251 252 253 254 255 256 257 258 259 260 261 262 263 264 265 266 267 268 269 270 271 272 273 274 275 276 277 278 279 280 281 282 283 284 285 286 <!DOCTYPE html > <html lang ="en" > <head > <meta charset ="UTF-8" > <meta name ="viewport" content ="width=device-width, initial-scale=1.0" > <title > Document</title > <style > :root { --white : #e9e9e9 ; --gray : #333 ; --blue : #0367a6 ; --lightblue : #008997 ; --button-radius : 0.7rem ; --max-width : 758px ; --max-height : 420px ; font-size : 16px ; font-family : -apple-system, BlinkMacSystemFont, "Segoe UI" , Roboto, Oxygen, Ubuntu, Cantarell, "Open Sans" , "Helvetica Neue" , sans-serif; } body { align-items : center; background : var (--white) url ("https://res.cloudinary.com/dbhnlktrv/image/upload/v1599997626/background_oeuhe7.jpg" ) no-repeat fixed center; background-size : cover; display : grid; height : 100vh ; place-items: center; } .form__title { font-weight : 300 ; margin : 0 0 1.25rem ; } .link { color : var (--gray); font-size : 0.9rem ; margin : 1.5rem 0 ; text-decoration : none; } .container { background-color : var (--white); border-radius : var (--button-radius); box-shadow : 0 0.9rem 1.7rem rgba (0 , 0 , 0 , 0.25 ), 0 0.7rem 0.7rem rgba (0 , 0 , 0 , 0.22 ); height : var (--max-height); max-width : var (--max-width); overflow : hidden; position : relative; width : 100% ; } .container__form { height : 100% ; position : absolute; top : 0 ; transition : all 0.6s ease-in-out; } .container--signin { left : 0 ; width : 50% ; z-index : 2 ; } .container .right-panel-active .container--signin { transform : translateX (100% ); } .container--signup { left : 0 ; opacity : 0 ; width : 50% ; z-index : 1 ; } .container .right-panel-active .container--signup { animation : show 0.6s ; opacity : 1 ; transform : translateX (100% ); z-index : 5 ; } .container__overlay { height : 100% ; left : 50% ; overflow : hidden; position : absolute; top : 0 ; transition : transform 0.6s ease-in-out; width : 50% ; z-index : 100 ; } .container .right-panel-active .container__overlay { transform : translateX (-100% ); } .overlay { background : var (--lightblue) url ("https://cdn.pixabay.com/photo/2018/08/14/13/23/ocean-3605547_1280.jpg" ) no-repeat fixed center; background-size : cover; height : 100% ; left : -100% ; position : relative; transform : translateX (0 ); transition : transform 0.6s ease-in-out; width : 200% ; } .container .right-panel-active .overlay { transform : translateX (50% ); } .overlay__panel { align-items : center; display : flex; flex-direction : column; height : 100% ; justify-content : center; position : absolute; text-align : center; top : 0 ; transform : translateX (0 ); transition : transform 0.6s ease-in-out; width : 50% ; } .overlay--left { transform : translateX (-20% ); } .container .right-panel-active .overlay--left { transform : translateX (0 ); } .overlay--right { right : 0 ; transform : translateX (0 ); } .container .right-panel-active .overlay--right { transform : translateX (20% ); } .btn { background-color : var (--blue); background-image : linear-gradient (90deg , var (--blue) 0% , var (--lightblue) 74% ); border-radius : 20px ; border : 1px solid var (--blue); color : var (--white); cursor : pointer; font-size : 0.8rem ; font-weight : bold; letter-spacing : 0.1rem ; padding : 0.9rem 4rem ; text-transform : uppercase; transition : transform 80ms ease-in; } .form >.btn { margin-top : 1.5rem ; } .btn :active { transform : scale (0.95 ); } .btn :focus { outline : none; } .form { background-color : var (--white); display : flex; align-items : center; justify-content : center; flex-direction : column; padding : 0 3rem ; height : 100% ; text-align : center; } .input { background-color : #fff ; border : none; padding : 0.9rem 0.9rem ; margin : 0.5rem 0 ; width : 100% ; } @keyframes show { 0% , 49.99% { opacity : 0 ; z-index : 1 ; } 50% , 100% { opacity : 1 ; z-index : 5 ; } } </style > </head > <body > <div class ="container right-panel-active" > <div class ="container__form container--signup" > <form action ="#" class ="form" id ="form1" > <h2 class ="form__title" > Sign Up</h2 > <label > <input type ="text" placeholder ="User" class ="input" /> </label > <label > <input type ="email" placeholder ="Email" class ="input" /> </label > <label > <input type ="password" placeholder ="Password" class ="input" /> </label > <button class ="btn" > Sign Up</button > </form > </div > <div class ="container__form container--signin" > <form action ="#" class ="form" id ="form2" > <h2 class ="form__title" > Sign In</h2 > <label > <input type ="email" placeholder ="Email" class ="input" /> </label > <label > <input type ="password" placeholder ="Password" class ="input" /> </label > <a href ="#" class ="link" > Forgot your password?</a > <button class ="btn" > Sign In</button > </form > </div > <div class ="container__overlay" > <div class ="overlay" > <div class ="overlay__panel overlay--left" > <button class ="btn" id ="signIn" > Sign In</button > </div > <div class ="overlay__panel overlay--right" > <button class ="btn" id ="signUp" > Sign Up</button > </div > </div > </div > </div > <script > const signInBtn = document .getElementById ("signIn" ); const signUpBtn = document .getElementById ("signUp" ); const fistForm = document .getElementById ("form1" ); const secondForm = document .getElementById ("form2" ); const container = document .querySelector (".container" ); signInBtn.addEventListener ("click" , () => { container.classList .remove ("right-panel-active" ); }); signUpBtn.addEventListener ("click" , () => { container.classList .add ("right-panel-active" ); }); fistForm.addEventListener ("submit" , (e ) => e.preventDefault ()); secondForm.addEventListener ("submit" , (e ) => e.preventDefault ()); </script > </body > </html >
运行截图
二、HTML模板 在一般的 Web 程序里,访问一个地址通常会返回一个包含各类信息的 HTML 页面。
因为我们的程序是动态的,页面中的某些信息需要根据不同的情况来进行调整,比如对登录和未登录用户显示不同的信息,所以页面需要在用户访问时根据程序逻辑动态生成。
我们把包含变量和运算逻辑的 HTML 或其他格式的文本叫做模板 ,执行这些变量替换和逻辑计算工作的过程被称为渲染 ,这个工作我们使用模板渲染引擎——Jinja2 来完成。
通常来讲,会新建一个templates目录来存放模板,static目录存放静态文件。
模板基本语法 1 2 3 4 5 6 <h1 > {{ username }} 的个人主页</h1 > {% if <p > {{ bio }} </p > {% else <p > 自我介绍为空。</p > {% endif
Jinja2 的语法和 Python 大致相同,你在后面会陆续接触到一些常见的用法。在模板里,你需要添加特定的定界符将 Jinja2 语句和变量标记出来,下面是三种常用的定界符:
{{ ... }} 用来标记变量。{% ... %} 用来标记语句,比如 if 语句,for 语句等。`` 用来写注释。
编写主页模板 我们先在 templates 目录下创建一个 index.html 文件,作为主页模板。主页需要显示电影条目列表和个人信息,代码如下所示:
templates/index.html:主页模板
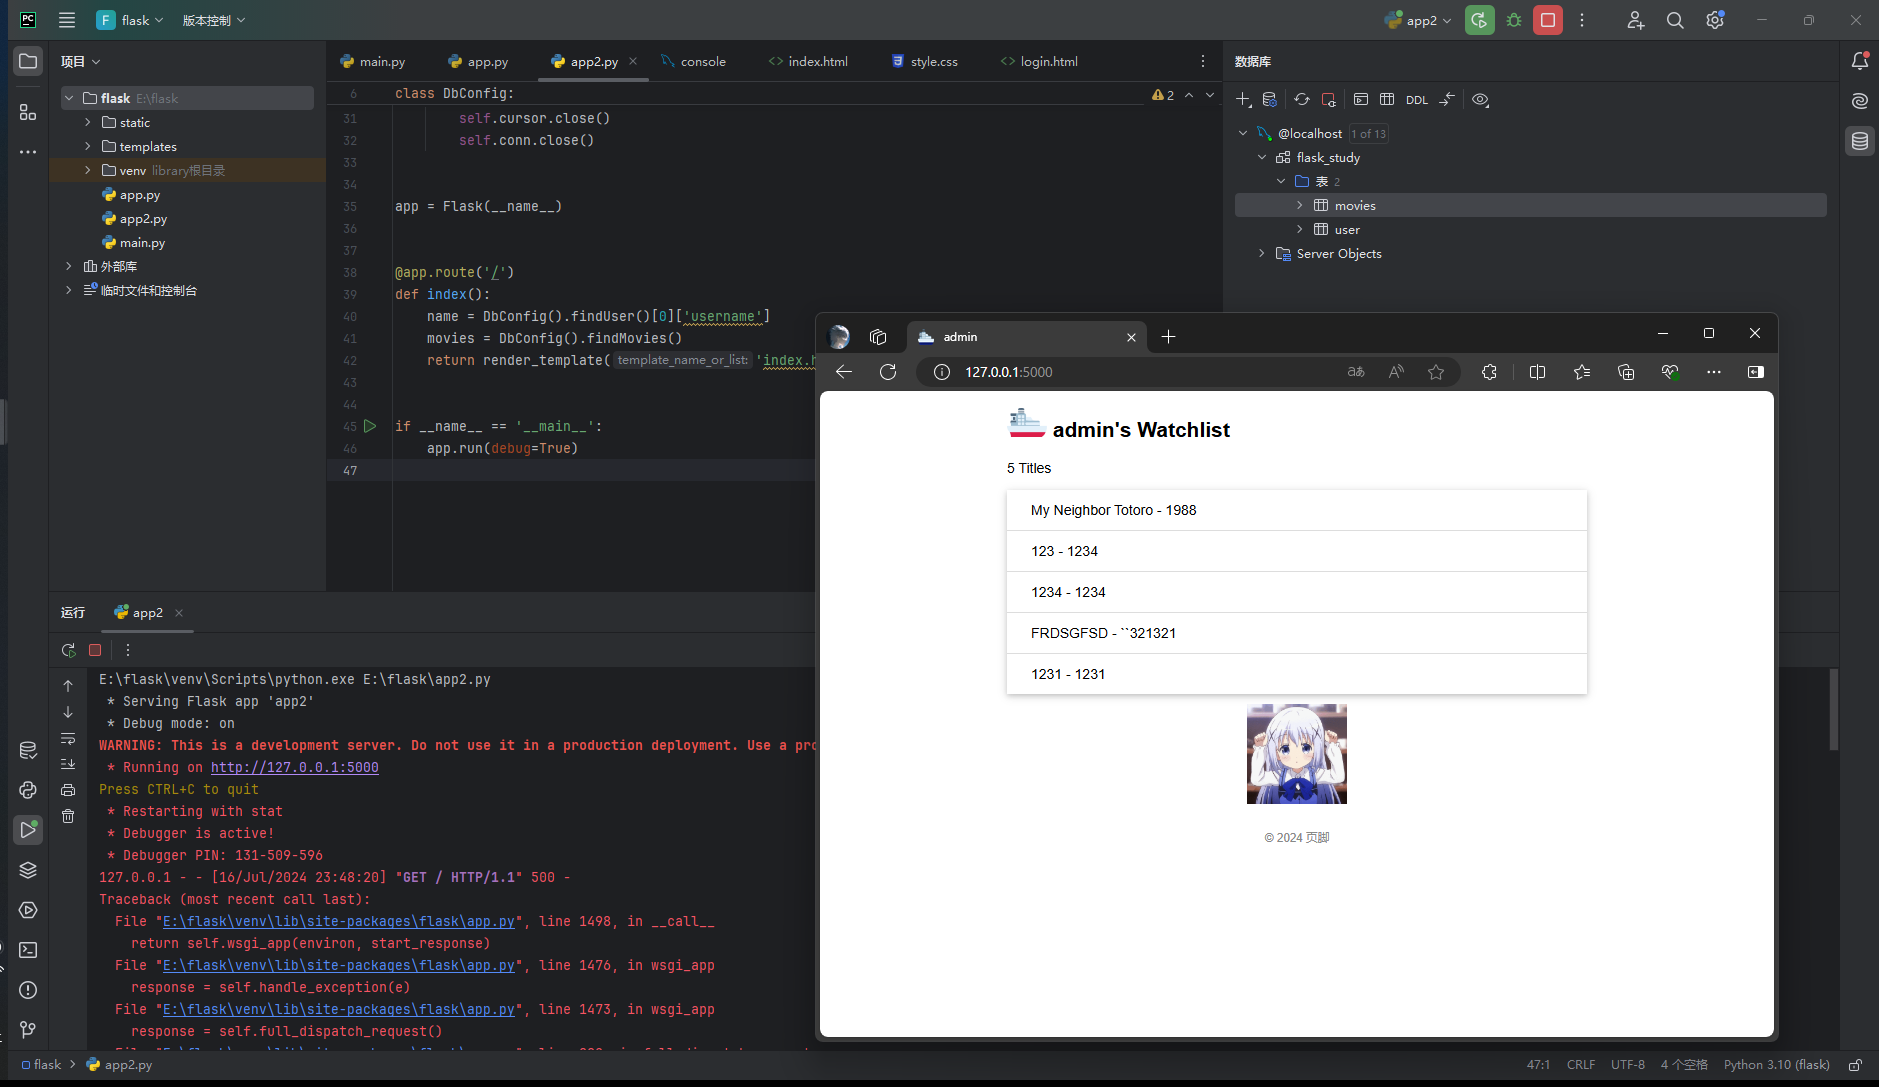
1 2 3 4 5 6 7 8 9 10 11 12 13 14 15 16 17 18 19 20 <!DOCTYPE html > <html lang ="en" > <head > <meta charset ="utf-8" > <title > {{ name }}'s Watchlist</title > </head > <body > <h2 > {{ name }}'s Watchlist</h2 > <p > {{ movies|length }} Titles</p > <ul > <li > {{ movie.title }} - {{ movie.year }}</li > {# 等同于 movie['title'] #}</ul > <footer > <small > © 2018 <a href ="http://helloflask.com/book/3" > HelloFlask</a > </small > </footer > </body > </html >
为了方便对变量进行处理,Jinja2 提供了一些过滤器,语法形式如下:
左侧是变量,右侧是过滤器名。比如,上面的模板里使用 length 过滤器来获取 movies 的长度,类似 Python 里的 len() 函数。
提示 访问 https://jinja.palletsprojects.com/en/3.0.x/templates/#builtin-filters 查看所有可用的过滤器。
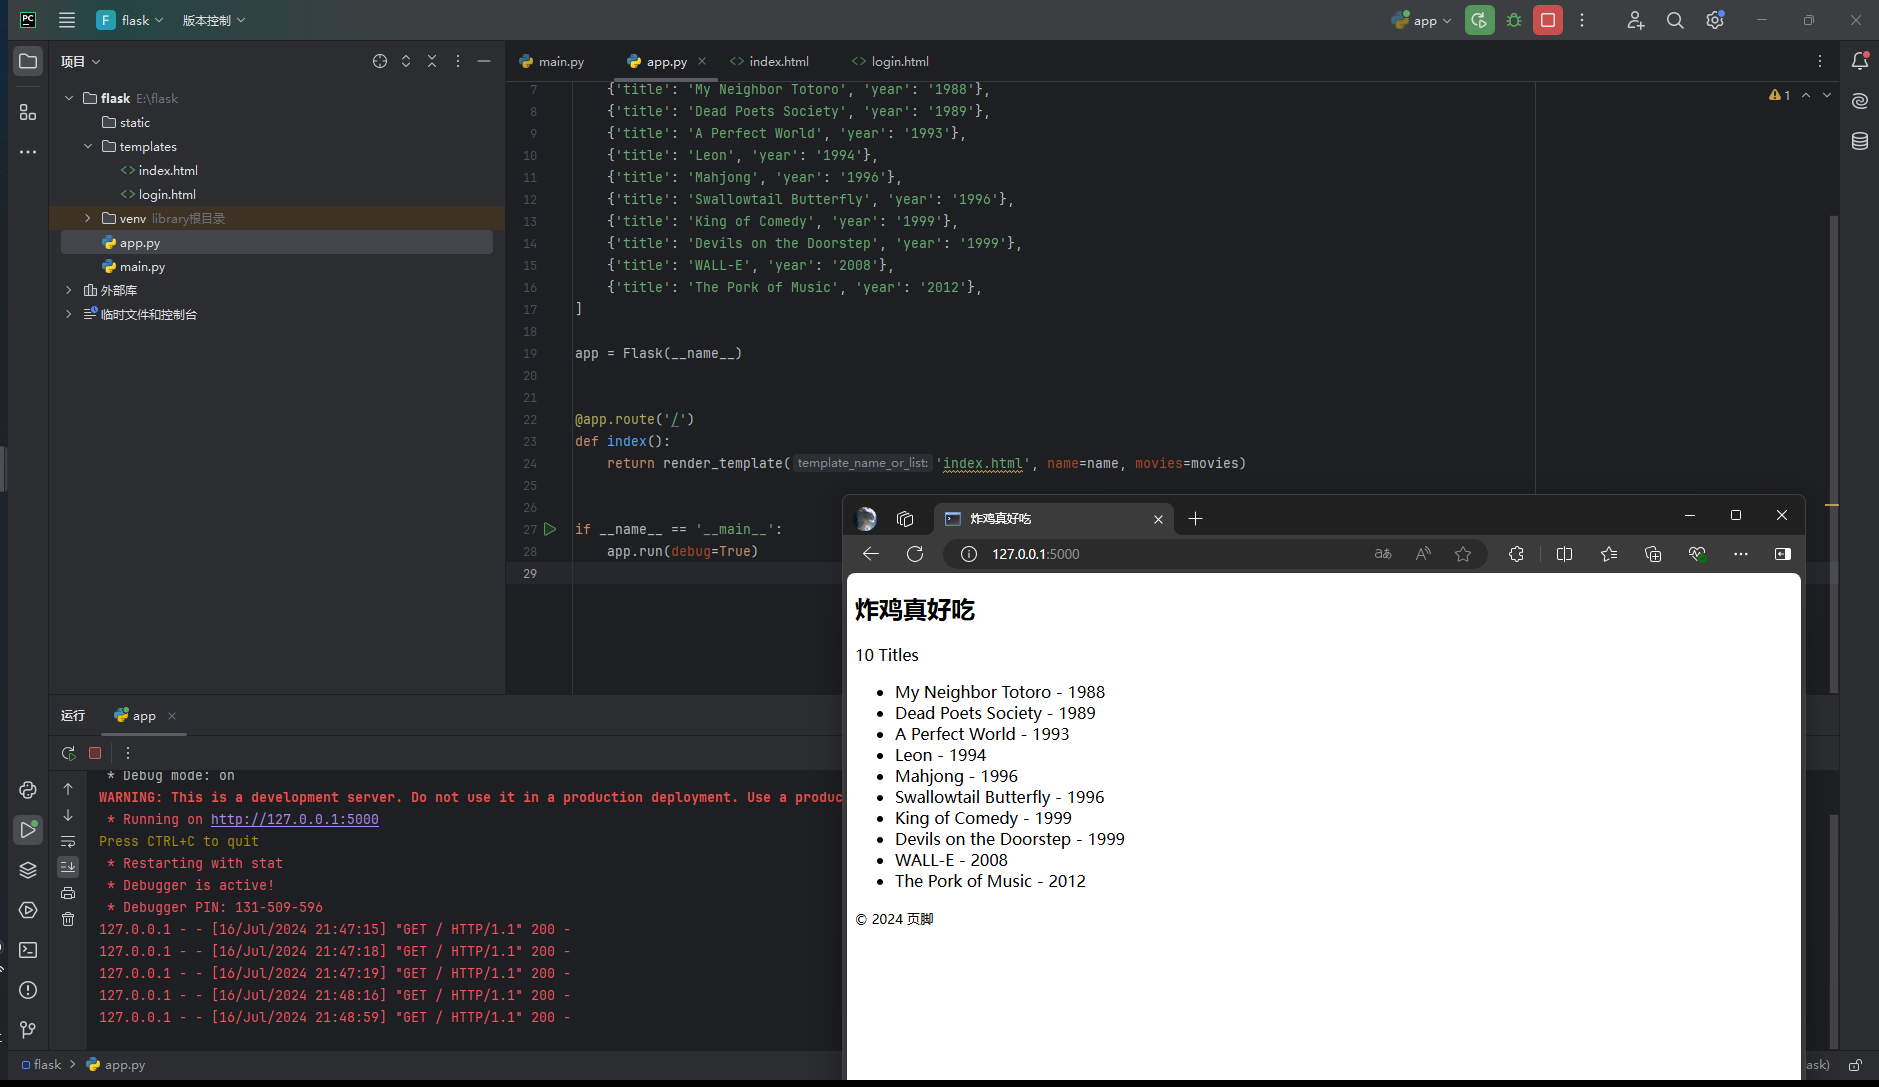
准备虚拟数据 为了模拟页面渲染,我们需要先创建一些虚拟数据,用来填充页面内容:
app.py:定义虚拟数据
1 2 3 4 5 6 7 8 9 10 11 12 13 name = 'Grey Li' 'title' : 'My Neighbor Totoro' , 'year' : '1988' },'title' : 'Dead Poets Society' , 'year' : '1989' },'title' : 'A Perfect World' , 'year' : '1993' },'title' : 'Leon' , 'year' : '1994' },'title' : 'Mahjong' , 'year' : '1996' },'title' : 'Swallowtail Butterfly' , 'year' : '1996' },'title' : 'King of Comedy' , 'year' : '1999' },'title' : 'Devils on the Doorstep' , 'year' : '1999' },'title' : 'WALL-E' , 'year' : '2008' },'title' : 'The Pork of Music' , 'year' : '2012' },
渲染主页模板 使用 render_template() 函数可以把模板渲染出来,必须传入的参数为模板文件名(相对于 templates 根目录的文件路径),这里即 'index.html'。为了让模板正确渲染,我们还要把模板内部使用的变量通过关键字参数传入这个函数,如下所示:
app.py:返回渲染好的模板作为响应
1 2 3 4 5 6 7 from flask import Flask, render_template@app.route('/' def index ():return render_template('index.html' , name=name, movies=movies)
为了更好的表示这个视图函数的作用,我们把原来的函数名 login 改为 index,意思是“索引”,即主页。
在传入 render_template() 函数的关键字参数中,左边的 movies 是模板中使用的变量名称,右边的 movies 则是该变量指向的实际对象。这里传入模板的 name 是字符串,movies 是列表,但能够在模板里使用的不只这两种 Python 数据结构,你也可以传入元组、字典、函数等。
render_template() 函数在调用时会识别并执行 index.html 里所有的 Jinja2 语句,返回渲染好的模板内容。在返回的页面中,变量会被替换为实际的值(包括定界符),语句(及定界符)则会在执行后被移除(注释也会一并移除)。
三、静态文件 静态文件(static files)和我们的模板概念相反,指的是内容不需要动态生成的文件。比如图片、CSS 文件和 JavaScript 脚本等。
在 Flask 中,我们需要创建一个 static 文件夹来保存静态文件,它应该和程序模块、templates 文件夹在同一目录层级。
生成静态文件 URL 在 HTML 文件里,引入这些静态文件需要给出资源所在的 URL。为了更加灵活,这些文件的 URL 可以通过 Flask 提供的 url_for() 函数来生成。
举例:
1 <img src ="{{ url_for('static', filename='foo.jpg') }}" >
在 Python 脚本里,url_for() 函数需要从 flask 包中导入,而在模板中则可以直接使用,因为 Flask 把一些常用的函数和对象添加到了模板上下文(环境)里。
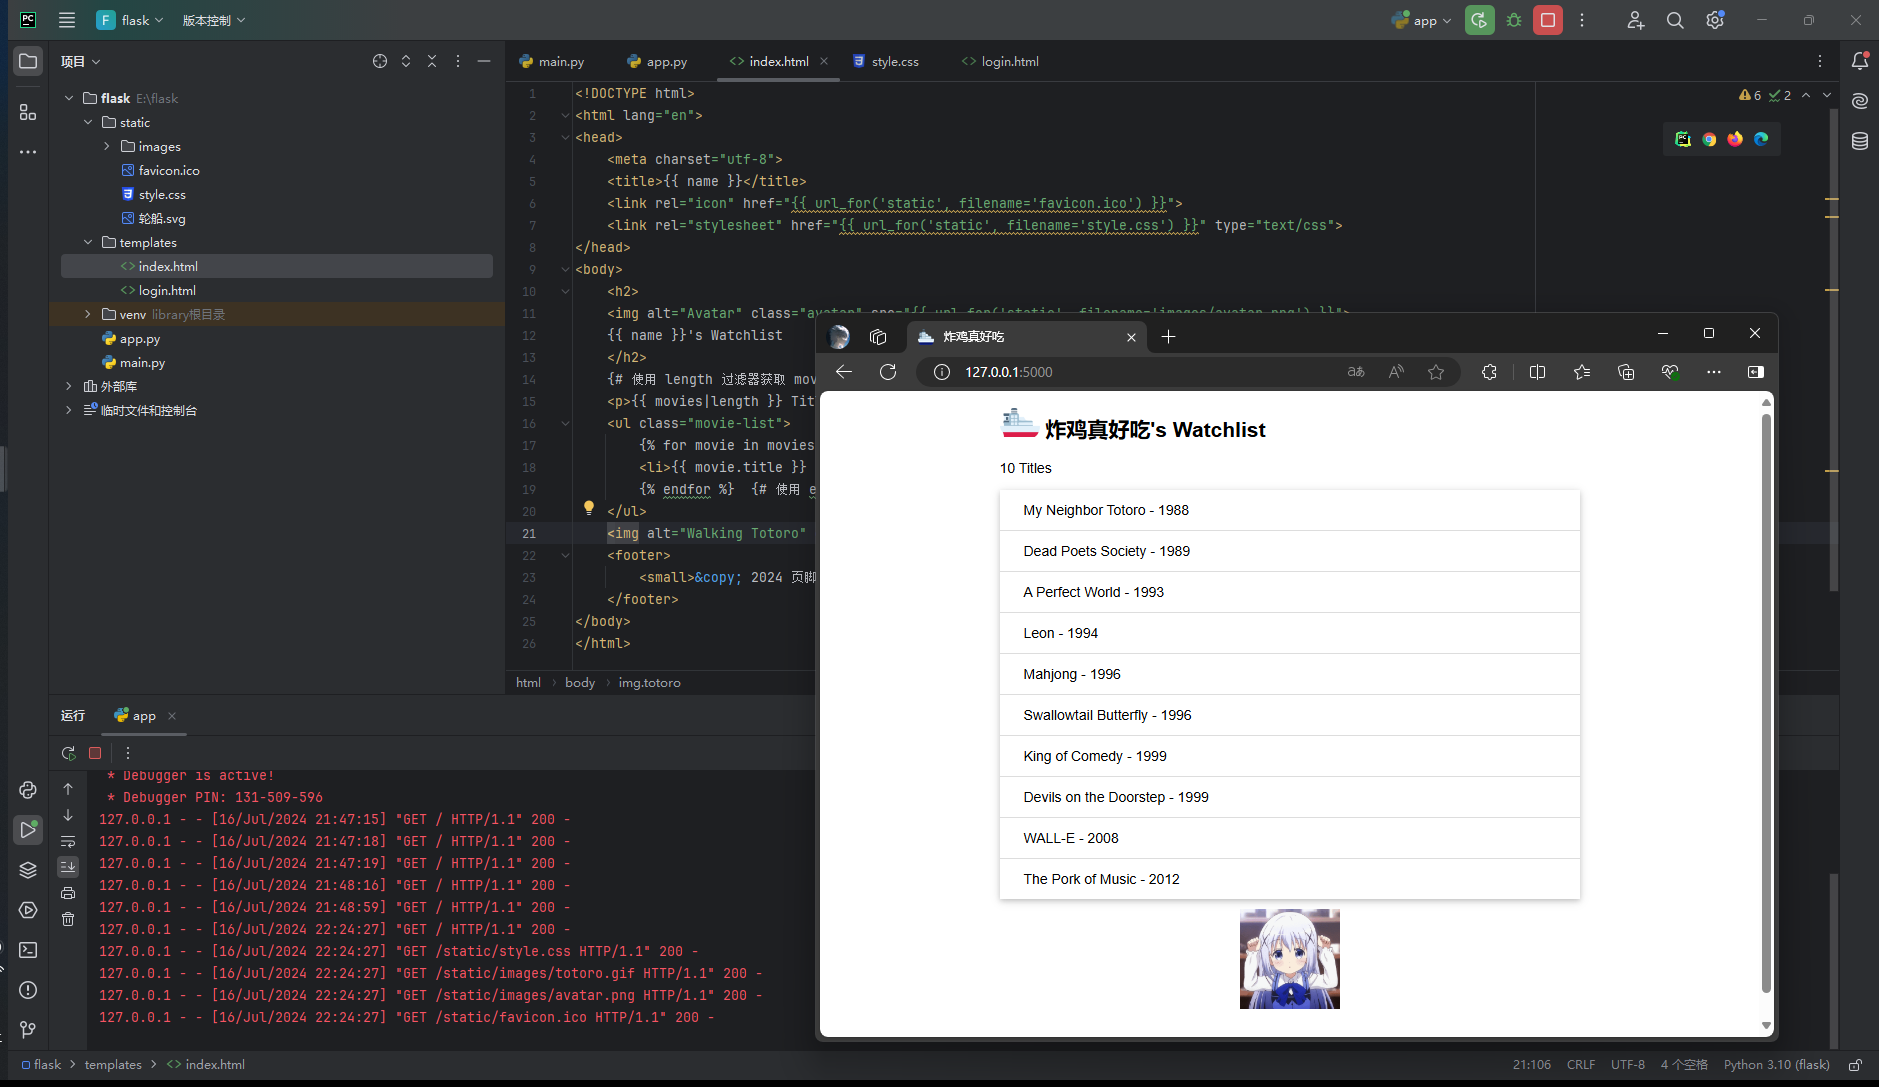
添加 Favicon Favicon(favourite icon) 是显示在标签页和书签栏的网站头像。你需要准备一个 ICO、PNG 或 GIF 格式的图片,大小一般为 16×16、32×32、48×48 或 64×64 像素。把这个图片放到 static 目录下,然后像下面这样在 HTML 模板里引入它:
templates/index.html:引入 Favicon
1 2 3 4 <head > ... <link rel ="icon" href =" {{ url_for ('static' , filename ='favicon.ico' ) }} " ></head >
保存后刷新页面,即可在浏览器标签页上看到这个图片。
添加图片 为了让页面不那么单调,我们来添加两个图片:一个是显示在页面标题旁边的头像,另一个是显示在页面底部的龙猫动图。我们在 static 目录下面创建一个子文件夹 images,把这两个图片都放到这个文件夹里:
1 2 $ cd static $ mkdir images
创建子文件夹并不是必须的,这里只是为了更好的组织同类文件。同样的,如果你有多个 CSS 文件,也可以创建一个 css 文件夹来组织他们。下面我们在页面模板中添加这两个图片,注意填写正确的文件路径:
templates/index.html:添加图片
1 2 3 4 5 6 <h2 > <img alt ="Avatar" src =" {{ url_for ('static' , filename ='images/avatar.png' ) }} " > {{ name }} 's Watchlist </h2 > ... <img alt ="Walking Totoro" src =" {{ url_for ('static' , filename ='images/totoro.gif' ) }} " >
提示 这两张图片你可以自己替换为任意的图片(注意更新文件名),也可以在示例程序的 GitHub 仓库 下载。
添加 CSS 虽然添加了图片,但页面还是非常简陋,因为我们还没有添加 CSS 定义。下面在 static 目录下创建一个 CSS 文件 style.css,内容如下:
static/style.css:定义页面样式
1 2 3 4 5 6 7 8 9 10 11 12 13 14 15 16 17 18 19 20 21 22 23 24 25 26 27 28 29 30 31 32 33 34 35 36 37 38 39 40 41 42 43 44 45 46 47 48 body {margin : auto;max-width : 580px ;font-size : 14px ;font-family : Helvetica, Arial, sans-serif;footer {color : #888 ;margin-top : 15px ;text-align : center;padding : 10px ;.avatar {width : 40px ;.movie-list {list-style-type : none;padding : 0 ;margin-bottom : 10px ;box-shadow : 0 2px 5px 0 rgba (0 , 0 , 0 , 0.16 ), 0 2px 10px 0 rgba (0 , 0 , 0 , 0.12 );.movie-list li {padding : 12px 24px ;border-bottom : 1px solid #ddd ;.movie-list li :last-child {border-bottom :none;.movie-list li :hover {background-color : #f8f9fa ;.totoro {display : block;margin : 0 auto;height : 100px ;
接着在页面的 <head> 标签内引入这个 CSS 文件:
templates/index.html:引入 CSS 文件
1 2 3 4 <head > ... <link rel ="stylesheet" href =" {{ url_for ('static' , filename ='style.css' ) }} " type ="text/css" ></head >
提示 当你把 CSS 写到单独的文件后,浏览器获取到这个文件后会对其进行缓存(其他静态文件同理,比如 JavaScript 文件)。Flask 从 2.0 版本开始支持自动重载静态文件的变化,如果你使用的仍然是旧版本的 Flask,那么每当你对 CSS 文件的内容进行更新后,都需要使用下面的快捷键清除缓存:
Google Chrome(Mac):Command + Shift + R
Google Chrome(Windows & Linux):Ctrl + F5
Firefox(Mac):Command + Shift + R
Firefox(Windows & Linux):Ctrl + F5
Safari:Command + Option + R
最后要为对应的元素设置 class 属性值,以便和对应的 CSS 定义关联起来:
templates/index.html:添加 class 属性
1 2 3 4 5 6 7 8 9 <h2 > <img alt ="Avatar" class ="avatar" src =" {{ url_for ('static' , filename ='images/avatar.png' ) }} " > {{ name }} 's Watchlist </h2 > ... <ul class ="movie-list" > ... </ul > <img alt ="Walking Totoro" class ="totoro" src =" {{ url_for ('static' , filename ='images/totoro.gif' ) }} " >
四、数据库 使用 SQLAlchemy 操作数据库 为了简化数据库操作,我们将使用 SQLAlchemy ——一个 Python 数据库工具(ORM,即对象关系映射)。借助 SQLAlchemy,你可以通过定义 Python 类来表示数据库里的一张表(类属性表示表中的字段 / 列),通过对这个类进行各种操作来代替写 SQL 语句。这个类我们称之为模型类 ,类中的属性我们将称之为字段 。
Flask 有大量的第三方扩展,这些扩展可以简化和第三方库的集成工作。我们下面将使用一个叫做 Flask-SQLAlchemy 的扩展来集成 SQLAlchemy。
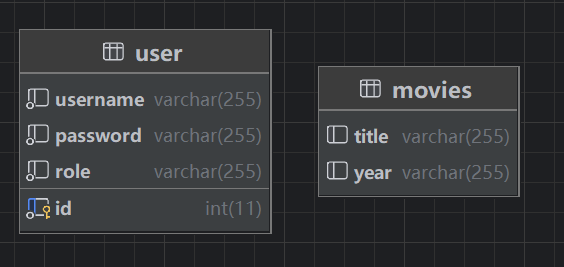
但是我的开发更喜欢用MySQL数据库或者SqlServer,这里不对这个数据库进行过多介绍。
使用MySQL数据库 在python中,可以使用pymysql库进行数据库操作
在mysql数据库中新建
编写一个mysql配置类
1 2 3 4 5 6 7 8 9 10 11 12 13 14 15 16 17 18 19 20 21 22 23 24 25 26 27 28 29 import pymysqlfrom pymysql import cursorsclass DbConfig :def __init__ (self ):'127.0.0.1' , 3306 , 'root' , '123456' , 'utf8mb4' , True , 'flask_study' , def findUser (self ):'select * from user where id=1' )return usersdef findMovies (self ):'select * from movies' )return moviesdef __del__ (self ):
在使用数据的时候可以像下面这样写
1 2 name = DbConfig().findUser()[0 ]['username' ]
完整的代码:
1 2 3 4 5 6 7 8 9 10 11 12 13 14 15 16 17 18 19 20 21 22 23 24 25 26 27 28 29 30 31 32 33 34 35 36 37 38 39 40 41 42 43 44 45 46 47 import pymysqlfrom flask import Flask, render_templatefrom pymysql import cursorsclass DbConfig :def __init__ (self ):'127.0.0.1' , 3306 , 'root' , '123456' , 'utf8mb4' , True , 'flask_study' , def findUser (self ):'select * from user where id=1' )return usersdef findMovies (self ):'select * from movies' )return moviesdef __del__ (self ):@app.route('/' def index ():0 ]['username' ]return render_template('index.html' , name=name, movies=movies)if __name__ == '__main__' :True )
大体上就是这个样子了
这种开发满足了基本需求,开发周期短,但是想要好看的页面,可以使用json数据做一个前后端分离或者整合的项目。